---
title: Legacy SAML
description: Learn how SAML facilitates secure information exchange between authentication servers and client applications.
sidebar:
order: 110
---
## Overview
The following guide shows you how to configure SAML using the legacy setup with SuperTokens.
:::warning[Since version `11.3` of the core service you can use SuperTokens as a SAML client.]
We recommend that you use the latest version with [the simplified setup](/authentication/enterprise/saml).
:::
:::danger[Archived, non-operational reference]
Do not use the commands on this page for a new or production deployment. This legacy flow has no currently validated, pinned Jackson release. The versioned contract for the Polis replacement has not been established for `/api/v1/saml/config`, SuperTokens-managed hosting, provider-name aliases, or the returned client credentials. The examples below are retained only to explain the historical integration and must not be treated as current Polis APIs.
:::
### BoxyHQ
[BoxyHQ](https://boxyhq.com/) is a commercial open-source company that has a product called "SAML Jackson" which helps integrate `SAML` providers into your application.
`SAML` Jackson is a perfect fit with SuperTokens because:
- It's an OAuth provider and a `SAML` client.
This fits with the architecture.
- For self hosted, it supports PostgreSQL and MySQL amongst [other databases](https://boxyhq.com/docs/jackson/deploy/service#database).
Self hosted SuperTokens only supports PostgreSQL as a data source.
`SAML` Jackson provides an HTTP service that you can host yourself or let BoxyHQ manage.
The HTTP service uses NodeJS, and is embeddable within your NodeJS backend.
However, because SuperTokens supports multiple backends, the focus is on deploying `SAML` Jackson as a microservice.
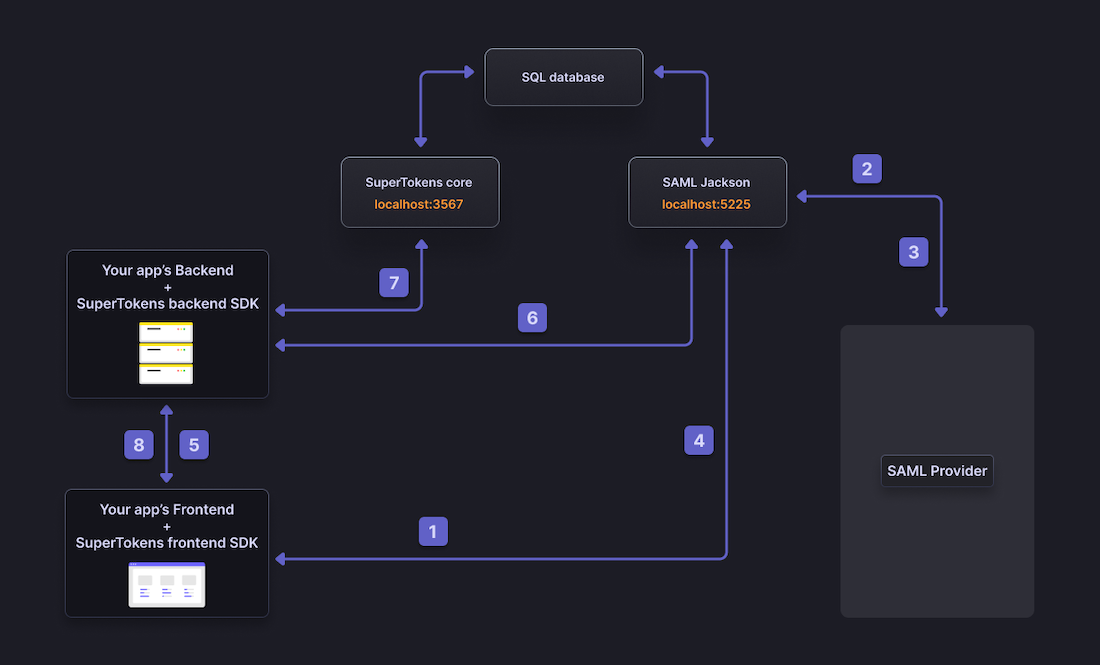 1. The user clicks on the login button and redirects to `SAML` Jackson's microservice at `http://localhost:5225/api/oauth/authorize`
2. `SAML` Jackson redirects the user to the `SAML` provider's login page where the user needs to enter their credentials
3. After successfully authenticating the user, the `SAML` provider redirects the user to `SAML` Jackson. Step (2) and (3) follow the `SAML` protocol.
4. `SAML` Jackson redirects the user to the frontend app on the configured callback URL. The callback URL contains the one-time use auth code.
5. SuperTokens' frontend `SDK` passes the one-time use auth code to your app's backend.
6. SuperTokens' backend `SDK` verifies the auth code by querying `SAML` Jackson. On success, `SAML` Jackson returns the end user's information and access token.
7. SuperTokens' backend `SDK` creates a new user in the core associated with the end user's email. New session tokens are also created
8. A SuperTokens' session establishes between your app's backend and frontend - logging in the user.
:::info[Example App]
An [example app on GitHub](https://github.com/supertokens/jackson-supertokens-express) with SuperTokens + `SAML` Jackson, for React and NodeJS express apps, is available. This uses [mocksaml.com](https://mocksaml.com/) as a `SAML` provider
:::
## Before you start
These instructions assume that you already are familiar with **SuperTokens** and you have configured a demo application.
If you have skipped those steps, follow the main [quickstart guide](/quickstart).
## Using the SuperTokens dashboard
### 1. Generate the XML metadata file from your SAML provider
Your SAML provider allows you to download a `.xml` file that you can upload to SAML Jackson. During this process, you need to provide it:
- the SSO URL and;
- the Entity ID.
You can learn more about these in the [SAML Jackson docs](https://boxyhq.com/docs/jackson/configure-saml-idp).
In the example app, [mocksaml.com](https://mocksaml.com/) serves as a free SAML provider for testing. When you navigate to the site, you see a "Download metadata" button which you should click on to get the `.xml` file.
### 2. Start the SAML Jackson service
The former unpinned `boxyhq/jackson` deployment command has been removed because it does not identify a reproducible, validated release. Do not substitute `boxyhq/jackson:latest`. To recover this flow, first establish and document a known-compatible image digest, its required environment variables, and its versioned API contract.
### 3. Create a new tenant in SuperTokens (if not done already)
1. The user clicks on the login button and redirects to `SAML` Jackson's microservice at `http://localhost:5225/api/oauth/authorize`
2. `SAML` Jackson redirects the user to the `SAML` provider's login page where the user needs to enter their credentials
3. After successfully authenticating the user, the `SAML` provider redirects the user to `SAML` Jackson. Step (2) and (3) follow the `SAML` protocol.
4. `SAML` Jackson redirects the user to the frontend app on the configured callback URL. The callback URL contains the one-time use auth code.
5. SuperTokens' frontend `SDK` passes the one-time use auth code to your app's backend.
6. SuperTokens' backend `SDK` verifies the auth code by querying `SAML` Jackson. On success, `SAML` Jackson returns the end user's information and access token.
7. SuperTokens' backend `SDK` creates a new user in the core associated with the end user's email. New session tokens are also created
8. A SuperTokens' session establishes between your app's backend and frontend - logging in the user.
:::info[Example App]
An [example app on GitHub](https://github.com/supertokens/jackson-supertokens-express) with SuperTokens + `SAML` Jackson, for React and NodeJS express apps, is available. This uses [mocksaml.com](https://mocksaml.com/) as a `SAML` provider
:::
## Before you start
These instructions assume that you already are familiar with **SuperTokens** and you have configured a demo application.
If you have skipped those steps, follow the main [quickstart guide](/quickstart).
## Using the SuperTokens dashboard
### 1. Generate the XML metadata file from your SAML provider
Your SAML provider allows you to download a `.xml` file that you can upload to SAML Jackson. During this process, you need to provide it:
- the SSO URL and;
- the Entity ID.
You can learn more about these in the [SAML Jackson docs](https://boxyhq.com/docs/jackson/configure-saml-idp).
In the example app, [mocksaml.com](https://mocksaml.com/) serves as a free SAML provider for testing. When you navigate to the site, you see a "Download metadata" button which you should click on to get the `.xml` file.
### 2. Start the SAML Jackson service
The former unpinned `boxyhq/jackson` deployment command has been removed because it does not identify a reproducible, validated release. Do not substitute `boxyhq/jackson:latest`. To recover this flow, first establish and document a known-compatible image digest, its required environment variables, and its versioned API contract.
### 3. Create a new tenant in SuperTokens (if not done already)
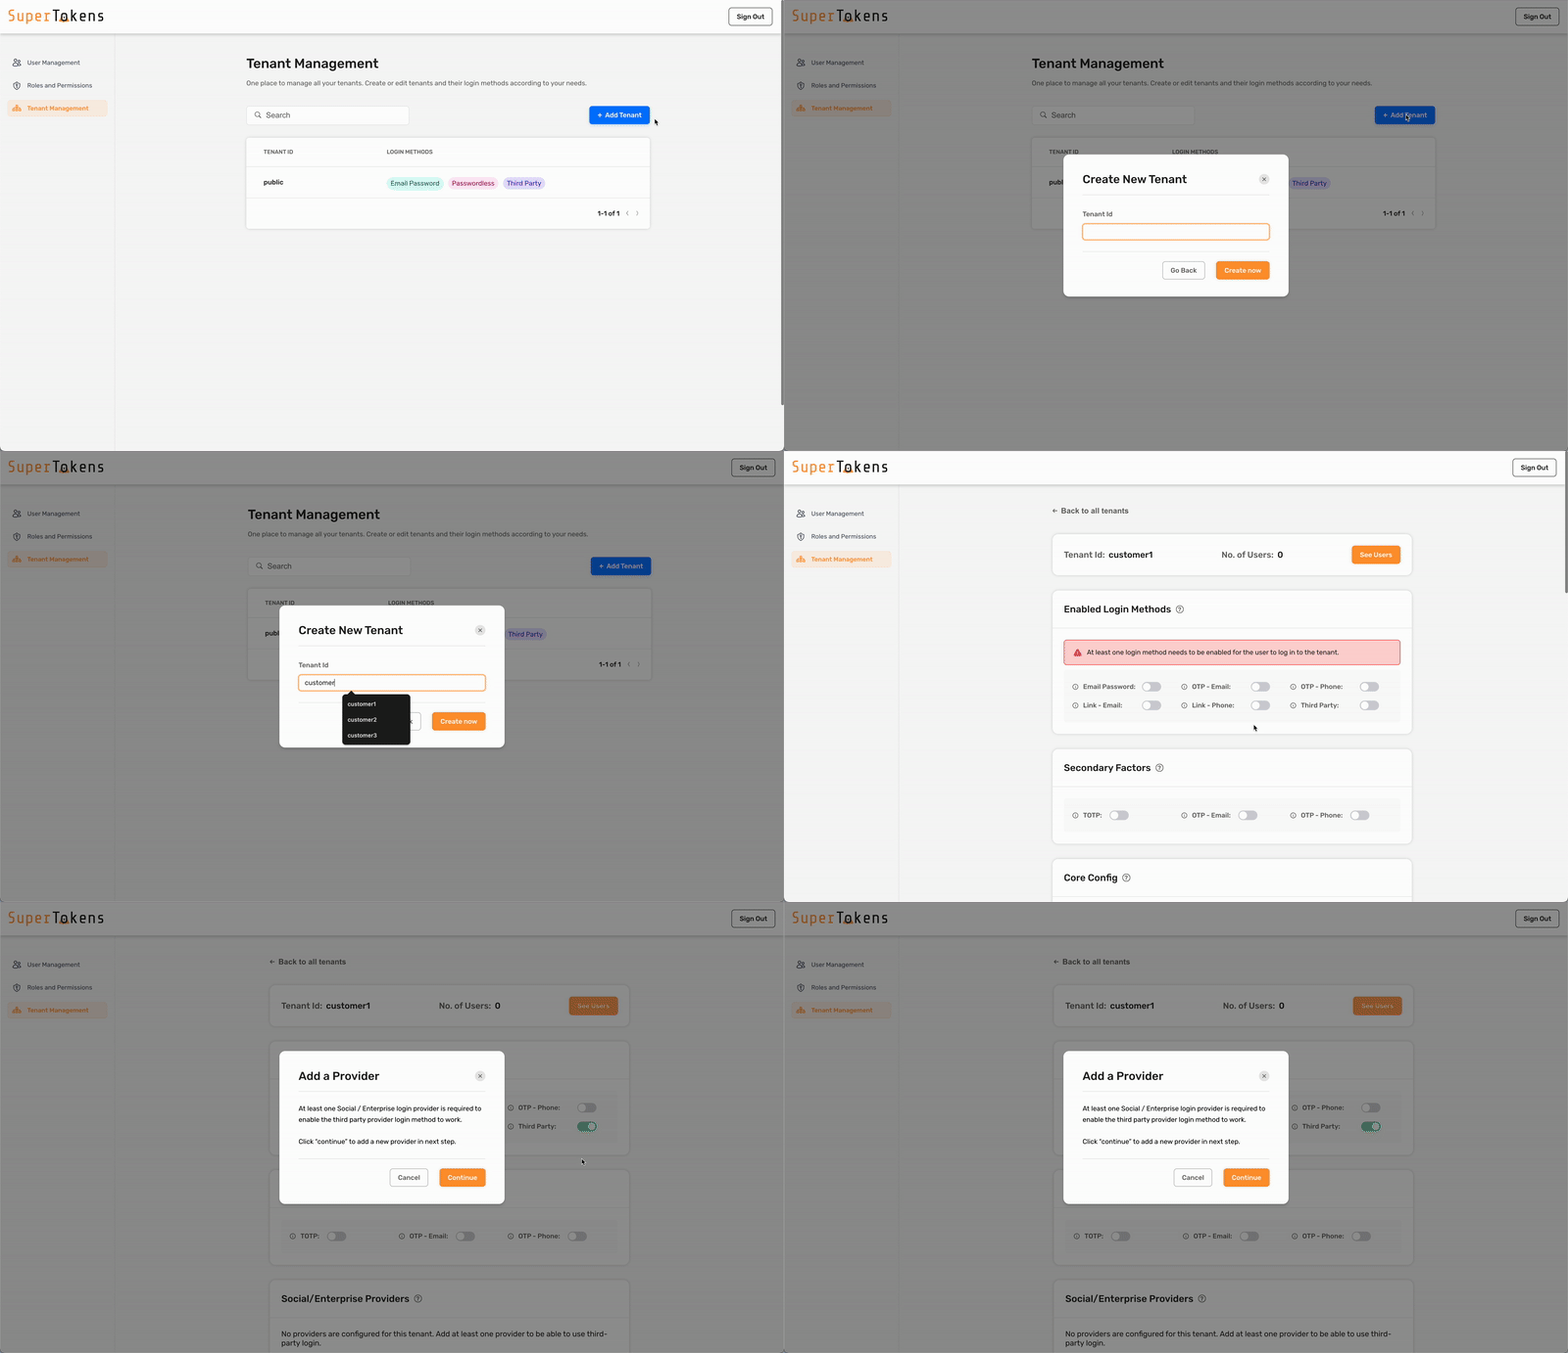 ### 4. Configure the SAML provider for the tenant
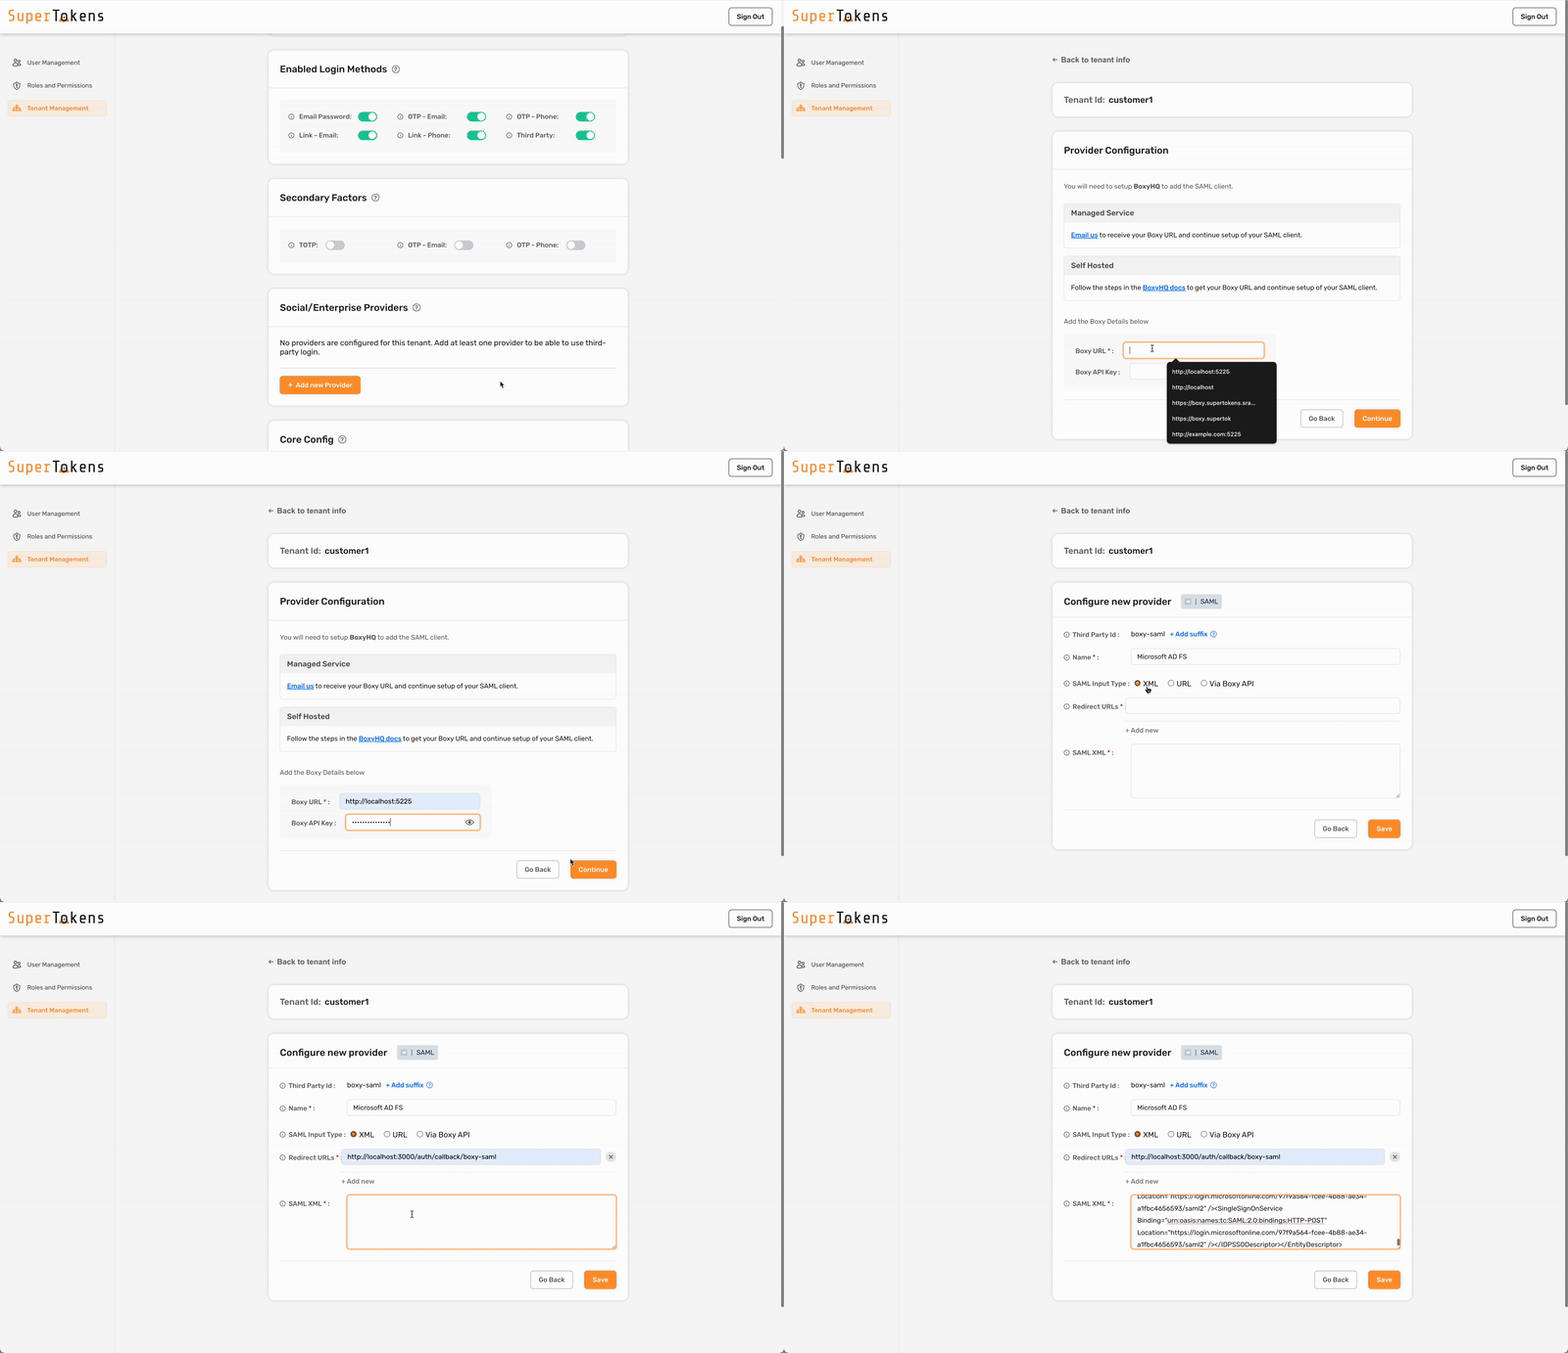 To configure SAML login with SuperTokens, ensure that you use the correct provider name in the third-party configuration.
Make sure to specify provider name with one of the following:
- Microsoft Entra ID
To configure SAML login with SuperTokens, ensure that you use the correct provider name in the third-party configuration.
Make sure to specify provider name with one of the following:
- Microsoft Entra ID
- Microsoft AD FS
- Okta
- Auth0
- Google
- OneLogin
- PingOne
- JumpCloud
- Rippling
- SAML
The historical dashboard flow assumed a separately hosted BoxyHQ server. SuperTokens-managed hosting for this legacy integration has not been validated against a current, versioned contract.
:::success[You have successfully configured a new tenant in SuperTokens. The next step is to wire up the frontend SDK to show the right login UI for this tenant. The specifics of this step depend on the UX that you want to provide to your users. The "Common UX flows" section documents two common UX flows.]
:::
### 5. Adding multiple SAML connections to a single tenant
If you have one SAML connection for a tenant, then the `Third Party Id` for that connection can be `boxy-saml`. This displays a single "SAML Login" button on the pre-built UI.
If you want to add a second SAML connection for the same tenant, follow the same steps as above, but also use the `Add Suffix` option for the Third Party Id.
For example, if a tenant has Active Directory and Okta login (both with SAML), you can create the Active Directory provider using `"boxy-saml"` as the `Third Party Id`.
For Okta, you could use `okta` as a suffix to make the `Third Party Id` equal to `"boxy-saml-okta"`.
You can also give them different names. Instead of "SAML Login" (that's shown above), you can use "Active Directory" and "Okta" to ensure that the button on the pre-built UI shows the right name.
---
## Using the BoxyHQ API
### 1. Generate the XML metadata file from your SAML provider
Your SAML provider allows you to download a `.xml` file that you can upload to SAML Jackson. During this process, you need to provide it:
- the SSO URL and;
- the Entity ID.
You can learn more about these in the [SAML Jackson docs](https://boxyhq.com/docs/jackson/configure-saml-idp).
In the example app, [mocksaml.com](https://mocksaml.com/) serves as a free SAML provider for testing. When you navigate to the site, you see a "Download metadata" button which you should click on to get the `.xml` file.
### 2. Convert the `.xml` file to base64
You can use [an online base64 encoder](https://www.base64encode.org/) to do this. First copy the contents of the `.xml` file, and then put it in the encoder tool. The output string is the base64 version of the .xml file.
For example, with an input `.xml` file (obtained from mocksaml.com):
```text
MIIC4jCCAcoCCQC33wnybT5QZDANBgkqhkiG9w0BAQsFADAyMQswCQYDVQQGEwJV
SzEPMA0GA1UECgwGQm94eUhRMRIwEAYDVQQDDAlNb2NrIFNBTUwwIBcNMjIwMjI4
MjE0NjM4WhgPMzAyMTA3MDEyMTQ2MzhaMDIxCzAJBgNVBAYTAlVLMQ8wDQYDVQQK
DAZCb3h5SFExEjAQBgNVBAMMCU1vY2sgU0FNTDCCASIwDQYJKoZIhvcNAQEBBQAD
ggEPADCCAQoCggEBALGfYettMsct1T6tVUwTudNJH5Pnb9GGnkXi9Zw/e6x45DD0
RuRONbFlJ2T4RjAE/uG+AjXxXQ8o2SZfb9+GgmCHuTJFNgHoZ1nFVXCmb/Hg8Hpd
4vOAGXndixaReOiq3EH5XvpMjMkJ3+8+9VYMzMZOjkgQtAqO36eAFFfNKX7dTj3V
pwLkvz6/KFCq8OAwY+AUi4eZm5J57D31GzjHwfjH9WTeX0MyndmnNB1qV75qQR3b
2/W5sGHRv+9AarggJkF+ptUkXoLtVA51wcfYm6hILptpde5FQC8RWY1YrswBWAEZ
NfyrR4JeSweElNHg4NVOs4TwGjOPwWGqzTfgTlECAwEAATANBgkqhkiG9w0BAQsF
AAOCAQEAAYRlYflSXAWoZpFfwNiCQVE5d9zZ0DPzNdWhAybXcTyMf0z5mDf6FWBW
5Gyoi9u3EMEDnzLcJNkwJAAc39Apa4I2/tml+Jy29dk8bTyX6m93ngmCgdLh5Za4
khuU3AM3L63g7VexCuO7kwkjh/+LqdcIXsVGO6XDfu2QOs1Xpe9zIzLpwm/RNYeX
UjbSj5ce/jekpAw7qyVVL4xOyh8AtUW1ek3wIw1MJvEgEPt0d16oshWJpoS1OT8L
r/22SvYEo3EmSGdTVGgk3x3s+A0qWAqTcyjr7Q4s/GKYRFfomGwz0TZ4Iw1ZN99M
m0eo2USlSRTVl7QHRTuiuSThHpLKQQ==
urn:oasis:names:tc:SAML:1.1:nameid-format:emailAddress
```
The base64 output is:
```text
PD94bWwgdmVyc2lvbj0iMS4wIiBlbmNvZGluZz0iVVRGLTgiIHN0YW5kYWxvbmU9Im5vIj8+PEVudGl0eURlc2NyaXB0b3IgeG1sbnM6bWQ9InVybjpvYXNpczpuYW1lczp0YzpTQU1MOjIuMDptZXRhZGF0YSIgZW50aXR5SUQ9Imh0dHBzOi8vc2FtbC5leGFtcGxlLmNvbS9lbnRpdHlpZCIgdmFsaWRVbnRpbD0iMjAyNi0wNi0yMlQxODozOTo1My4wMDBaIj48SURQU1NPRGVzY3JpcHRvciBXYW50QXV0aG5SZXF1ZXN0c1NpZ25lZD0iZmFsc2UiIHByb3RvY29sU3VwcG9ydEVudW1lcmF0aW9uPSJ1cm46b2FzaXM6bmFtZXM6dGM6U0FNTDoyLjA6cHJvdG9jb2wiPjxLZXlEZXNjcmlwdG9yIHVzZT0ic2lnbmluZyI+PEtleUluZm8geG1sbnM6ZHM9Imh0dHA6Ly93d3cudzMub3JnLzIwMDAvMDkveG1sZHNpZyMiPjxYNTA5RGF0YT48WDUwOUNlcnRpZmljYXRlPk1JSUM0akNDQWNvQ0NRQzMzd255YlQ1UVpEQU5CZ2txaGtpRzl3MEJBUXNGQURBeU1Rc3dDUVlEVlFRR0V3SlYKU3pFUE1BMEdBMVVFQ2d3R1FtOTRlVWhSTVJJd0VBWURWUVFEREFsTmIyTnJJRk5CVFV3d0lCY05Nakl3TWpJNApNakUwTmpNNFdoZ1BNekF5TVRBM01ERXlNVFEyTXpoYU1ESXhDekFKQmdOVkJBWVRBbFZMTVE4d0RRWURWUVFLCkRBWkNiM2g1U0ZFeEVqQVFCZ05WQkFNTUNVMXZZMnNnVTBGTlREQ0NBU0l3RFFZSktvWklodmNOQVFFQkJRQUQKZ2dFUEFEQ0NBUW9DZ2dFQkFMR2ZZZXR0TXNjdDFUNnRWVXdUdWROSkg1UG5iOUdHbmtYaTlady9lNng0NUREMApSdVJPTmJGbEoyVDRSakFFL3VHK0FqWHhYUThvMlNaZmI5K0dnbUNIdVRKRk5nSG9aMW5GVlhDbWIvSGc4SHBkCjR2T0FHWG5kaXhhUmVPaXEzRUg1WHZwTWpNa0ozKzgrOVZZTXpNWk9qa2dRdEFxTzM2ZUFGRmZOS1g3ZFRqM1YKcHdMa3Z6Ni9LRkNxOE9Bd1krQVVpNGVabTVKNTdEMzFHempId2ZqSDlXVGVYME15bmRtbk5CMXFWNzVxUVIzYgoyL1c1c0dIUnYrOUFhcmdnSmtGK3B0VWtYb0x0VkE1MXdjZlltNmhJTHB0cGRlNUZRQzhSV1kxWXJzd0JXQUVaCk5meXJSNEplU3dlRWxOSGc0TlZPczRUd0dqT1B3V0dxelRmZ1RsRUNBd0VBQVRBTkJna3Foa2lHOXcwQkFRc0YKQUFPQ0FRRUFBWVJsWWZsU1hBV29acEZmd05pQ1FWRTVkOXpaMERQek5kV2hBeWJYY1R5TWYwejVtRGY2RldCVwo1R3lvaTl1M0VNRURuekxjSk5rd0pBQWMzOUFwYTRJMi90bWwrSnkyOWRrOGJUeVg2bTkzbmdtQ2dkTGg1WmE0CmtodVUzQU0zTDYzZzdWZXhDdU83a3dramgvK0xxZGNJWHNWR082WERmdTJRT3MxWHBlOXpJekxwd20vUk5ZZVgKVWpiU2o1Y2UvamVrcEF3N3F5VlZMNHhPeWg4QXRVVzFlazN3SXcxTUp2RWdFUHQwZDE2b3NoV0pwb1MxT1Q4TApyLzIyU3ZZRW8zRW1TR2RUVkdnazN4M3MrQTBxV0FxVGN5anI3UTRzL0dLWVJGZm9tR3d6MFRaNEl3MVpOOTlNCm0wZW8yVVNsU1JUVmw3UUhSVHVpdVNUaEhwTEtRUT09CjwvWDUwOUNlcnRpZmljYXRlPjwvWDUwOURhdGE+PC9LZXlJbmZvPjwvS2V5RGVzY3JpcHRvcj48TmFtZUlERm9ybWF0PnVybjpvYXNpczpuYW1lczp0YzpTQU1MOjEuMTpuYW1laWQtZm9ybWF0OmVtYWlsQWRkcmVzczwvTmFtZUlERm9ybWF0PjxTaW5nbGVTaWduT25TZXJ2aWNlIEJpbmRpbmc9InVybjpvYXNpczpuYW1lczp0YzpTQU1MOjIuMDpiaW5kaW5nczpIVFRQLVJlZGlyZWN0IiBMb2NhdGlvbj0iaHR0cHM6Ly9tb2Nrc2FtbC5jb20vYXBpL3NhbWwvc3NvIi8+PFNpbmdsZVNpZ25PblNlcnZpY2UgQmluZGluZz0idXJuOm9hc2lzOm5hbWVzOnRjOlNBTUw6Mi4wOmJpbmRpbmdzOkhUVFAtUE9TVCIgTG9jYXRpb249Imh0dHBzOi8vbW9ja3NhbWwuY29tL2FwaS9zYW1sL3NzbyIvPjwvSURQU1NPRGVzY3JpcHRvcj48L0VudGl0eURlc2NyaXB0b3I+
```
### 3. Start the SAML Jackson service
The historical deployment command is intentionally omitted. A compatible Jackson image version or digest and its deployment contract have not been established.
### 4. Historical SAML Jackson configuration request
The following request records the old integration shape only. Do not send it to Polis: no versioned authoritative contract has confirmed that Polis supports this route, fields, authentication scheme, or response credentials.
```bash
curl --location --request POST 'http://localhost:5225/api/v1/saml/config' \
--header 'Authorization: Api-Key secret' \
--header 'Content-Type: application/x-www-form-urlencoded' \
--data-urlencode 'encodedRawMetadata=' \
--data-urlencode 'defaultRedirectUrl=' \
--data-urlencode 'redirectUrl=[""]' \
--data-urlencode 'tenant=' \
--data-urlencode 'product=' \
--data-urlencode 'name=demo-config' \
--data-urlencode 'description=Demo SAML config'
```
You can learn more about the configuration values [in the SAML Jackson docs](https://boxyhq.com/docs/jackson/saml-flow#2-saml-config-api).
For the example app, you can see [this command here](https://github.com/supertokens/jackson-supertokens-express/blob/main/addTenant.sh). This helper script, `addTenant.sh`, provides the command. You can run it like:
```bash
./addTenant.sh
# example
./addTenant.sh customer1
./addTenant.sh customer2
```
The output of this command provides you the `client_id` and `client_secret` for this tenant. You need to provide these values to SuperTokens for this tenant when configuring this tenant's providers (see below).
### 5. Create a new tenant in SuperTokens (if not done already)
```tsx
import Multiteancy from "supertokens-node/recipe/multitenancy";
async function createTenant() {
let resp = await Multiteancy.createOrUpdateTenant("customer1", {
firstFactors: ["thirdparty"],
});
if (resp.createdNew) {
// new tenant was created
} else {
// existing tenant's config was modified.
}
}
```
```go
import (
"github.com/supertokens/supertokens-golang/recipe/multitenancy"
"github.com/supertokens/supertokens-golang/recipe/multitenancy/multitenancymodels"
)
func main() {
tenantId := "customer1"
thirdPartyEnabled := true
resp, err := multitenancy.CreateOrUpdateTenant(tenantId, multitenancymodels.TenantConfig{
ThirdPartyEnabled: &thirdPartyEnabled,
})
if err != nil {
// handle error
}
if resp.OK.CreatedNew {
// new tenant was created
} else {
// existing tenant's config was modified.
}
}
```
```python
from supertokens_python.recipe.multitenancy.asyncio import create_or_update_tenant
from supertokens_python.recipe.multitenancy.interfaces import TenantConfigCreateOrUpdate
async def some_func():
result = await create_or_update_tenant(
"customer1", TenantConfigCreateOrUpdate(first_factors=["thirdparty"])
)
if result.status != "OK":
print("handle error")
elif result.created_new:
print("new tenant was created")
else:
print("existing tenant's config was modified.")
```
```python
from supertokens_python.recipe.multitenancy.syncio import create_or_update_tenant
from supertokens_python.recipe.multitenancy.interfaces import TenantConfigCreateOrUpdate
def some_func():
result = create_or_update_tenant(
"customer1", TenantConfigCreateOrUpdate(first_factors=["thirdparty"])
)
if result.status != "OK":
print("handle error")
elif result.created_new:
print("new tenant was created")
else:
print("existing tenant's config was modified.")
```
### 6. Configure the SAML provider for the tenant
```tsx
import Multitenancy from "supertokens-node/recipe/multitenancy";
async function addThirdPartyConfigToTenant() {
let resp = await Multitenancy.createOrUpdateThirdPartyConfig("customer1", {
thirdPartyId: "boxy-saml",
name: "",
clients: [
{
clientId: "",
clientSecret: "",
additionalConfig: {
boxyURL: "http://localhost:5225",
},
},
],
});
if (resp.createdNew) {
// SAML Login added to customer1
} else {
// Existing SAML Login config overwritten for customer1
}
}
```
```go
import (
"github.com/supertokens/supertokens-golang/recipe/multitenancy"
"github.com/supertokens/supertokens-golang/recipe/thirdparty/tpmodels"
)
func main() {
tenantId := "customer1"
resp, err := multitenancy.CreateOrUpdateThirdPartyConfig(tenantId, tpmodels.ProviderConfig{
ThirdPartyId: "boxy-saml",
Name: "",
Clients: []tpmodels.ProviderClientConfig{
{
ClientID: "",
ClientSecret: "",
AdditionalConfig: map[string]interface{}{
"boxyURL": "http://localhost:5225",
},
},
},
}, nil)
if err != nil {
// handle error
}
if resp.OK.CreatedNew {
// SAML Login added to customer1
} else {
// Existing SAML Login config overwritten for customer1
}
}
```
```python
from supertokens_python.recipe.multitenancy.asyncio import create_or_update_third_party_config
from supertokens_python.recipe.thirdparty.provider import ProviderConfig, ProviderClientConfig
async def some_func():
result = await create_or_update_third_party_config("customer1", ProviderConfig(
third_party_id="boxy-saml",
name="",
clients=[
ProviderClientConfig(
client_id="",
client_secret="",
additional_config={
"boxyURL": "http://localhost:5225",
}
),
],
))
if result.status != "OK":
print("handle error")
elif result.created_new:
print("SAML Login added to customer1")
else:
print("Existing SAML Login config overwritten for customer1")
```
```python
from supertokens_python.recipe.multitenancy.syncio import create_or_update_third_party_config
from supertokens_python.recipe.thirdparty.provider import ProviderConfig, ProviderClientConfig
result = create_or_update_third_party_config("customer1", ProviderConfig(
third_party_id="boxy-saml",
name="",
clients=[
ProviderClientConfig(
client_id="",
client_secret="",
additional_config={
"boxyURL": "http://localhost:5225",
}
),
],
))
if result.status != "OK":
print("handle error")
elif result.created_new:
print("SAML Login added to customer1")
else:
print("Existing SAML Login config overwritten for customer1")
```
To configure SAML login with SuperTokens, ensure that you use the correct provider name in the third-party configuration.
Make sure to replace `` in the code snippet above with one of the following
- Microsoft Entra ID
- Microsoft AD FS
- Okta
- Auth0
- Google
- OneLogin
- PingOne
- JumpCloud
- Rippling
- SAML
The provider configuration above is historical. Current SuperTokens-managed hosting and the replacement service contract have not been validated.
:::success[You have successfully configured a new tenant in SuperTokens. The next step is to wire up the frontend SDK to show the right login UI for this tenant. The specifics of this step depend on the UX that you want to provide to your users. The "Common UX flows" section documents two common UX flows.]
:::
### 7. Adding multiple SAML connections to a single tenant
If you have one SAML connection for a tenant, then the `thirdPartyId` for that connection can be `boxy-saml`. This displays a single "SAML Login" button on the pre-built UI.
If you want to add a second SAML connection for the same tenant, follow the same steps as above. Instead of using `"boxy-saml"` as the `thirdPartyId`, set it to another value that starts with `"boxy-saml"` (for step 6).
For example, if a tenant has Active Directory and Okta login (both with SAML), you can create the Active Directory provider using `"boxy-saml"` as the `thirdPartyId`. For Okta, you could use `"boxy-saml-okta"`. It's important that the string starts with `"boxy-saml"`. You can also give them different names. Instead of "SAML Login" (that's shown above), you can use "Active Directory" and "Okta" to ensure that the button on the pre-built UI shows the right name.
---
## See also