---
title: Initial Setup
description: Learn how to initialize and configure user roles with SuperTokens.
sidebar:
order: 2
---
Add SuperTokens roles and permissions to this application. Inspect the existing backend, frontend, session configuration, and tenant model first. Define roles and permissions that match the application's resources, initialize the UserRoles recipe, assign roles to users, and protect backend and frontend routes. Check whether role data should be included in access tokens, preserve existing authorization conventions, and validate authorized, unauthorized, and cross-tenant access.
## Overview
When you work with the `UserRoles` recipe you should follow these steps:
1. **Create a role and assign permissions to it**
2. **Assign roles to users**
3. **Protect frontend and backend routes by verifying that the user has the correct role and permissions**
The next sections show you the actual instructions on how to achieve this.
## Before you start
:::info[Multi Tenancy]
In a multi tenant setup, roles, and permissions share across all tenants, however, the mapping of users to roles are on a per tenant level.
For example, if you create one role (`"admin"`) and add permissions to it for `read:all` and `write:all`, this role can reuse across all tenants.
If you have user ID `user1` that has access to `tenant1` and `tenant2`, you can give them the `admin` role in `tenant1`, but not in `tenant2`.
:::
## Steps
### 1. Initialize the recipe
```tsx
import SuperTokens from "supertokens-node";
import UserRoles from "supertokens-node/recipe/userroles";
SuperTokens.init({
supertokens: {
connectionURI: "...",
},
appInfo: {
apiDomain: "...",
appName: "...",
websiteDomain: "...",
},
recipeList: [UserRoles.init()],
});
```
```go
import (
"github.com/supertokens/supertokens-golang/recipe/userroles"
"github.com/supertokens/supertokens-golang/supertokens"
)
func main() {
supertokens.Init(supertokens.TypeInput{
RecipeList: []supertokens.Recipe{
userroles.Init(nil),
},
})
}
```
```python check=false reason="initialization excerpt omits deployment connection config"
from supertokens_python import InputAppInfo, init
from supertokens_python.recipe import userroles
init(
app_info=InputAppInfo(
api_domain="...", app_name="...", website_domain="..."
),
framework='...',
recipe_list=[
# Initialize other recipes as seen in the quick setup guide
userroles.init()
]
)
```
By default, the user roles recipe adds the roles and permission information into a user's session (if they have assigned roles & permissions). If you do not want roles or permissions information in the session, or want to manually add it yourself, you can provide the following input configs to the `UserRoles.init` function:
```tsx
import UserRoles from "supertokens-node/recipe/userroles";
UserRoles.init({
skipAddingRolesToAccessToken: true,
skipAddingPermissionsToAccessToken: true,
});
```
```go
import (
"github.com/supertokens/supertokens-golang/recipe/userroles"
"github.com/supertokens/supertokens-golang/recipe/userroles/userrolesmodels"
"github.com/supertokens/supertokens-golang/supertokens"
)
func main() {
supertokens.Init(supertokens.TypeInput{
AppInfo: supertokens.AppInfo{ /*...*/ },
RecipeList: []supertokens.Recipe{
userroles.Init(&userrolesmodels.TypeInput{
SkipAddingRolesToAccessToken: true,
SkipAddingPermissionsToAccessToken: true,
}),
},
})
}
```
```python check=false reason="initialization excerpt omits deployment connection config"
from supertokens_python import InputAppInfo, init
from supertokens_python.recipe import userroles
init(
app_info=InputAppInfo(
api_domain="...", app_name="...", website_domain="..."
),
framework='...',
recipe_list=[
userroles.init(skip_adding_roles_to_access_token=True,
skip_adding_permissions_to_access_token=True)
]
)
```
### 2. Create roles and permissions
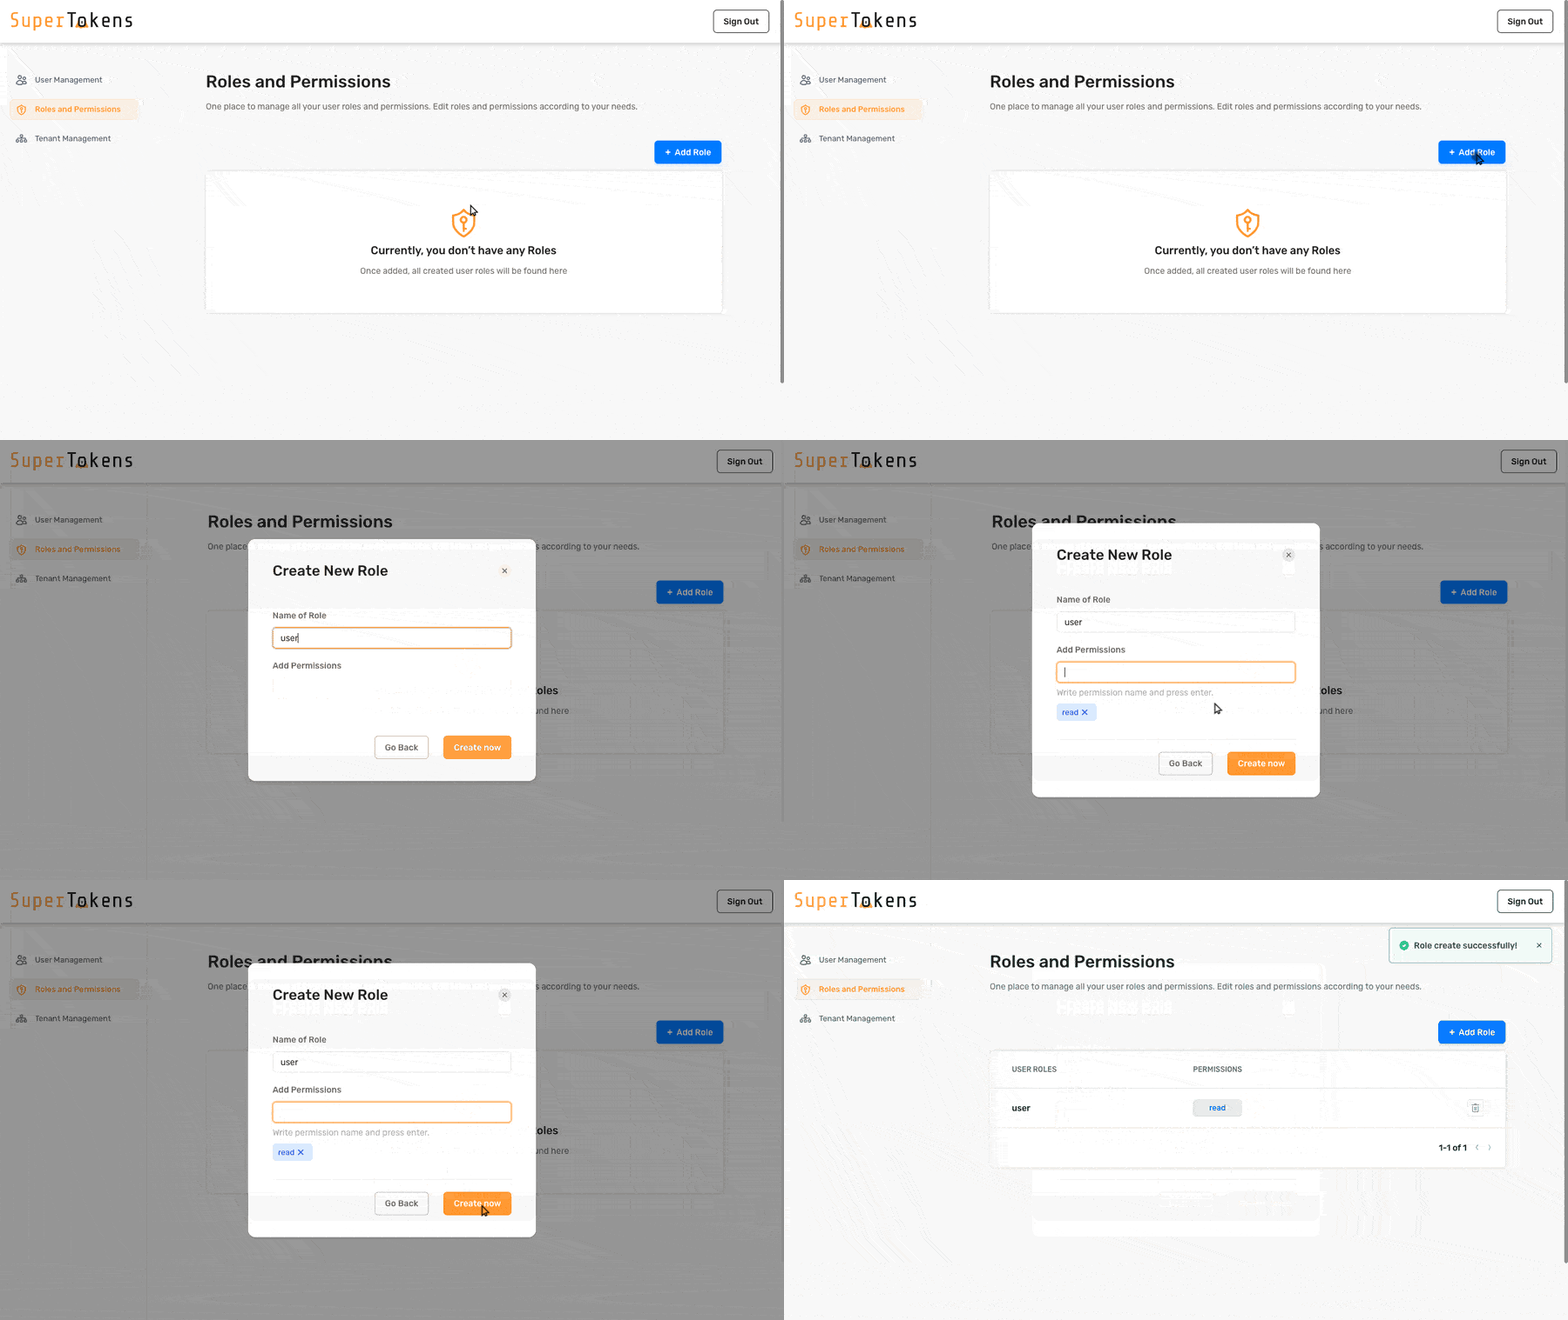
Roles and permissions are simple string values.
They should represent entities and actions that are relevant to your business logic.
To create them use the next code snippet as a reference.
When you create a role you can also include the permissions that the role should have.
 ```tsx
import UserRoles from "supertokens-node/recipe/userroles";
async function createRole() {
const response = await UserRoles.createNewRoleOrAddPermissions("user", ["read"]);
if (response.createdNewRole === false) {
// The role already exists
}
}
```
```go
import (
"github.com/supertokens/supertokens-golang/recipe/userroles"
)
func createRole() {
resp, err := userroles.CreateNewRoleOrAddPermissions("user", []string{
"read",
}, nil)
if err != nil {
// TODO: Handle error
return
}
if resp.OK.CreatedNewRole == false {
// The role already exists
}
}
```
```python
from supertokens_python.recipe.userroles.asyncio import create_new_role_or_add_permissions
async def create_role():
res = await create_new_role_or_add_permissions("user", ["read"])
if not res.created_new_role:
# The role already existed
pass
```
```python
from supertokens_python.recipe.userroles.syncio import create_new_role_or_add_permissions
def create_role():
res = create_new_role_or_add_permissions("user", ["read"])
if not res.created_new_role:
# The role already existed
pass
```
```bash
curl --location --request PUT '/recipe/role' \
--header 'api-key: ' \
--header 'Content-Type: application/json; charset=utf-8' \
--data-raw '{
"role": "user",
"permissions": [
"read"
]
}'
```
### 3. Assign roles to users
After you create a user account, you can assign roles to them.
You can do this by overriding the authentication recipes with a function that calls the `UserRoles` API after a successful sign up.
The next code snippet shows you what function to call to connect a user to a role.
To figure out where to call that function, check the documentation for the authentication method that you use: [passwordless](/authentication/passwordless/hooks-and-overrides), [email-password](/authentication/email-password/hooks-and-overrides) or [third-party](/authentication/social/hooks-and-overrides).
```tsx
import UserRoles from "supertokens-node/recipe/userroles";
async function addRoleToUser(userId: string) {
const response = await UserRoles.addRoleToUser("public", userId, "user");
if (response.status === "UNKNOWN_ROLE_ERROR") {
// No such role exists
return;
}
if (response.didUserAlreadyHaveRole === true) {
// The user already had the role
}
}
```
```go
import (
"github.com/supertokens/supertokens-golang/recipe/userroles"
)
func addRoleToUser(userId string) {
response, err := userroles.AddRoleToUser("public", userId, "user", nil)
if err != nil {
// TODO: Handle error
return
}
if response.UnknownRoleError != nil {
// No such role exists
return
}
if response.OK.DidUserAlreadyHaveRole {
// The user already had the role
}
}
```
```python
from supertokens_python.recipe.userroles.asyncio import add_role_to_user
from supertokens_python.recipe.userroles.interfaces import UnknownRoleError
async def add_role_to_user_func(user_id: str):
role = "user"
res = await add_role_to_user("public", user_id, role)
if isinstance(res, UnknownRoleError):
# No such role exists
return
if res.did_user_already_have_role:
# User already had this role
pass
```
```python
from supertokens_python.recipe.userroles.syncio import add_role_to_user
from supertokens_python.recipe.userroles.interfaces import UnknownRoleError
def add_role_to_user_func(user_id: str):
role = "user"
res = add_role_to_user("public", user_id, role)
if isinstance(res, UnknownRoleError):
# No such role exists
return
if res.did_user_already_have_role:
# User already had this role
pass
```
```bash
curl --location --request PUT 'http://localhost:3567/recipe/user/role' \
--header 'api-key: ' \
--header 'Content-Type: application/json; charset=utf-8' \
--data-raw '{
"userId": "fa7a0841-b533-4478-95533-0fde890c3483",
"role": "user"
}'
```
#### Assign roles to a session
If you want to associate a role to a user after you create a session, you can do this by manually calling the function described in the next code snippet.
For information on how to access the session object that you need to pass to the function, check either the [`Verify Session`](/additional-verification/session-verification/protect-api-routes#using-verify-session) or the [`Get Session`](/additional-verification/session-verification/protect-api-routes#using-get-session) documentation.
```tsx
import { UserRoleClaim, PermissionClaim } from "supertokens-node/recipe/userroles";
import { SessionContainer } from "supertokens-node/recipe/session";
async function addRolesAndPermissionsToSession(session: SessionContainer) {
// we add the user's roles to the user's session
await session.fetchAndSetClaim(UserRoleClaim);
// we add the permissions of a user to the user's session
await session.fetchAndSetClaim(PermissionClaim);
}
```
```go
import (
"github.com/supertokens/supertokens-golang/recipe/session/sessmodels"
"github.com/supertokens/supertokens-golang/recipe/userroles/userrolesclaims"
)
func addRolesAndPermissionsToSession(session sessmodels.SessionContainer) error {
// we add the user's roles to the user's session
err := session.FetchAndSetClaim(userrolesclaims.UserRoleClaim)
if err != nil {
return err
}
// we add the user's permissions to the user's session
err = session.FetchAndSetClaim(userrolesclaims.PermissionClaim)
if err != nil {
return err
}
return nil
}
```
```python
from supertokens_python.recipe.session import SessionContainer
from supertokens_python.recipe.userroles import UserRoleClaim, PermissionClaim
async def add_roles_and_permissions_to_session(session: SessionContainer):
# we add the user's roles to the user's session
await session.fetch_and_set_claim(UserRoleClaim)
# we add the user's permissions to the user's session
await session.fetch_and_set_claim(PermissionClaim)
```
```python
from supertokens_python.recipe.session import SessionContainer
from supertokens_python.recipe.userroles import UserRoleClaim, PermissionClaim
def add_roles_and_permissions_to_session(session: SessionContainer):
# we add the user's roles to the user's session
session.sync_fetch_and_set_claim(UserRoleClaim)
# we add the user's permissions to the user's session
session.sync_fetch_and_set_claim(PermissionClaim)
```
:::info[Multi Tenancy]
Whilst roles and permissions share across apps, the association of roles to users is on a per tenant level.
If using SDK functions to add a role to a user, you can also pass in a `tenantId` to the function. This tells SuperTokens to add the role for that user for that tenant.
In the code examples above, the `"public"` `tenantId` goes in, which is the default `tenantId` for users.
You can fetch the user's `tenantId` from their current session, or from their user object (which you can fetch using their `userId`).
Note that if you associate a role to a user ID for a tenant, and that user ID doesn't belong to that tenant, then the operation still succeeds.
:::
---
## See also
```tsx
import UserRoles from "supertokens-node/recipe/userroles";
async function createRole() {
const response = await UserRoles.createNewRoleOrAddPermissions("user", ["read"]);
if (response.createdNewRole === false) {
// The role already exists
}
}
```
```go
import (
"github.com/supertokens/supertokens-golang/recipe/userroles"
)
func createRole() {
resp, err := userroles.CreateNewRoleOrAddPermissions("user", []string{
"read",
}, nil)
if err != nil {
// TODO: Handle error
return
}
if resp.OK.CreatedNewRole == false {
// The role already exists
}
}
```
```python
from supertokens_python.recipe.userroles.asyncio import create_new_role_or_add_permissions
async def create_role():
res = await create_new_role_or_add_permissions("user", ["read"])
if not res.created_new_role:
# The role already existed
pass
```
```python
from supertokens_python.recipe.userroles.syncio import create_new_role_or_add_permissions
def create_role():
res = create_new_role_or_add_permissions("user", ["read"])
if not res.created_new_role:
# The role already existed
pass
```
```bash
curl --location --request PUT '/recipe/role' \
--header 'api-key: ' \
--header 'Content-Type: application/json; charset=utf-8' \
--data-raw '{
"role": "user",
"permissions": [
"read"
]
}'
```
### 3. Assign roles to users
After you create a user account, you can assign roles to them.
You can do this by overriding the authentication recipes with a function that calls the `UserRoles` API after a successful sign up.
The next code snippet shows you what function to call to connect a user to a role.
To figure out where to call that function, check the documentation for the authentication method that you use: [passwordless](/authentication/passwordless/hooks-and-overrides), [email-password](/authentication/email-password/hooks-and-overrides) or [third-party](/authentication/social/hooks-and-overrides).
```tsx
import UserRoles from "supertokens-node/recipe/userroles";
async function addRoleToUser(userId: string) {
const response = await UserRoles.addRoleToUser("public", userId, "user");
if (response.status === "UNKNOWN_ROLE_ERROR") {
// No such role exists
return;
}
if (response.didUserAlreadyHaveRole === true) {
// The user already had the role
}
}
```
```go
import (
"github.com/supertokens/supertokens-golang/recipe/userroles"
)
func addRoleToUser(userId string) {
response, err := userroles.AddRoleToUser("public", userId, "user", nil)
if err != nil {
// TODO: Handle error
return
}
if response.UnknownRoleError != nil {
// No such role exists
return
}
if response.OK.DidUserAlreadyHaveRole {
// The user already had the role
}
}
```
```python
from supertokens_python.recipe.userroles.asyncio import add_role_to_user
from supertokens_python.recipe.userroles.interfaces import UnknownRoleError
async def add_role_to_user_func(user_id: str):
role = "user"
res = await add_role_to_user("public", user_id, role)
if isinstance(res, UnknownRoleError):
# No such role exists
return
if res.did_user_already_have_role:
# User already had this role
pass
```
```python
from supertokens_python.recipe.userroles.syncio import add_role_to_user
from supertokens_python.recipe.userroles.interfaces import UnknownRoleError
def add_role_to_user_func(user_id: str):
role = "user"
res = add_role_to_user("public", user_id, role)
if isinstance(res, UnknownRoleError):
# No such role exists
return
if res.did_user_already_have_role:
# User already had this role
pass
```
```bash
curl --location --request PUT 'http://localhost:3567/recipe/user/role' \
--header 'api-key: ' \
--header 'Content-Type: application/json; charset=utf-8' \
--data-raw '{
"userId": "fa7a0841-b533-4478-95533-0fde890c3483",
"role": "user"
}'
```
#### Assign roles to a session
If you want to associate a role to a user after you create a session, you can do this by manually calling the function described in the next code snippet.
For information on how to access the session object that you need to pass to the function, check either the [`Verify Session`](/additional-verification/session-verification/protect-api-routes#using-verify-session) or the [`Get Session`](/additional-verification/session-verification/protect-api-routes#using-get-session) documentation.
```tsx
import { UserRoleClaim, PermissionClaim } from "supertokens-node/recipe/userroles";
import { SessionContainer } from "supertokens-node/recipe/session";
async function addRolesAndPermissionsToSession(session: SessionContainer) {
// we add the user's roles to the user's session
await session.fetchAndSetClaim(UserRoleClaim);
// we add the permissions of a user to the user's session
await session.fetchAndSetClaim(PermissionClaim);
}
```
```go
import (
"github.com/supertokens/supertokens-golang/recipe/session/sessmodels"
"github.com/supertokens/supertokens-golang/recipe/userroles/userrolesclaims"
)
func addRolesAndPermissionsToSession(session sessmodels.SessionContainer) error {
// we add the user's roles to the user's session
err := session.FetchAndSetClaim(userrolesclaims.UserRoleClaim)
if err != nil {
return err
}
// we add the user's permissions to the user's session
err = session.FetchAndSetClaim(userrolesclaims.PermissionClaim)
if err != nil {
return err
}
return nil
}
```
```python
from supertokens_python.recipe.session import SessionContainer
from supertokens_python.recipe.userroles import UserRoleClaim, PermissionClaim
async def add_roles_and_permissions_to_session(session: SessionContainer):
# we add the user's roles to the user's session
await session.fetch_and_set_claim(UserRoleClaim)
# we add the user's permissions to the user's session
await session.fetch_and_set_claim(PermissionClaim)
```
```python
from supertokens_python.recipe.session import SessionContainer
from supertokens_python.recipe.userroles import UserRoleClaim, PermissionClaim
def add_roles_and_permissions_to_session(session: SessionContainer):
# we add the user's roles to the user's session
session.sync_fetch_and_set_claim(UserRoleClaim)
# we add the user's permissions to the user's session
session.sync_fetch_and_set_claim(PermissionClaim)
```
:::info[Multi Tenancy]
Whilst roles and permissions share across apps, the association of roles to users is on a per tenant level.
If using SDK functions to add a role to a user, you can also pass in a `tenantId` to the function. This tells SuperTokens to add the role for that user for that tenant.
In the code examples above, the `"public"` `tenantId` goes in, which is the default `tenantId` for users.
You can fetch the user's `tenantId` from their current session, or from their user object (which you can fetch using their `userId`).
Note that if you associate a role to a user ID for a tenant, and that user ID doesn't belong to that tenant, then the operation still succeeds.
:::
---
## See also